Sunday, 6 April 2014

How to see the mac adress of your phone

I ll show you how to see the mac address of your phone.


Get mac address on your android phone
ANDROID:
Finding MAC address on a Android Phones
1. On your HOME screen, click on MENU, goto SETTINGS.
2. click on  About Phone.
3. Click on Status. 
And VIEW your Wi-Fi MAC address!

Finding MAC address on an Android Tablet
1. On your HOME screen, click on MENU, goto SETTINGS.
2. click on  About Tablet.
3. Click on Status. 
And VIEW your Wi-Fi MAC address!

iOS [ iPad, i pod or iPhone Touch]

Finding MAC address on in iPad, iPhone or iPod Touch-.
1.  Click on Settings.
2.  Select General -> About.
MAC address can be seen in Wi-Fi Address.
 Windows Phones
Finding  MAC address  on a windows phone.1. On Start,  flick left to App  list.
2. Tap Setting, then About, then More info.
3. MAC Address  can be seen.

HOW TO MAKE MOBILE PHONE JAMMER


MOBILE PHONE JAMMER

     A mobile phone jammer is an instrument used to prevent cellular phones from receiving signals from base stations.Smaller jamming devices are battery operated. Some look like cellphones and use cellphone batteries. Stronger devices can be plugged into a standard outlet or wired into a vehicle's electrical system.

     Many cell phones use GSM800 mobile standard to operate, thus our VCO (sweeping oscillator) is tuned to the 800MHz frequency range. It may be quite difficult to make this one to work properly without some skills and good testing tools, but in result you will have the efficient VCO
 

HOW TO MAKE MOBILE PHONE JAMMER

1. Used mixer was originally made for 600MHz but We modified it a little and it works perfectly for 800MHz.

2. The amplifier makes fantastic thing with output power. Despite it draws additional power supply, it is worth it.


3. Jammer case was made from old aluminium box and UHF connectors So we took body of old Motorola phone.


4. Those connectors must be soldered to the mini-circuit to work properly.


5. To supply this little signal jammer the nine volts battery with voltage regulator is enough. We have separated it from other electronic components with foam plastic. 


6. Don't forget to make a power switch for your new creation.

7. Attach antennas to the UHF connectors. 

 Jammer Scheme:

Classes of IP Addresses


Class A - IP addresses

"Class A" IP addresses are for very large networks. The left most bit of the left most octet of a "Class A" network is reserved as "0". The first octet of a "Class A" IP address is used to identify the Network and the three remaining octets are used to identify the host in that particular network (Network.Host.Host.Host). 

The 32 bits of a "Class A" IP address can be represented as 0xxxxxxx.xxxxxxxx.xxxxxxxx.xxxxxxxx.
The minimum possible value for the leftmost octet in binaries is 00000000 (decimal equivalent is 0) and the maximum possible value for the leftmost octet is 01111111 (decimal equivalent is 127). Therefore for a "Class A" IP address, leftmost octet must have a value between 0-127 (0.X.X.X to 127.X.X.X).
The network 127.0.0.0 is known as loopback network. The IP address 127.0.0.1 is used by the host computer to send a message back to itself. It is commonly used for troubleshooting andnetwork testing

Computers not connected directly to the Internet need not have globally-unique IP addresses. They need an IP addresses unique to that network only. 10.0.0.0 network belongs to "Class A" is reserved for private use and can be used inside any organization.

Class B - IP addresses

"Class B" IP addresses are used for medium-sized networks. Two left most bits of the left most octet of a "Class B" network is reserved as "10". The first two octets of a "Class B" IP address is used to identify the Network and the remaining two octets are used to identify the host in that particular network (Network.Network.Host.Host).

The 32 bits of a "Class B" IP address can be represented as 10xxxxxx.xxxxxxxx.xxxxxxxx.xxxxxxxx.
The minimum possible value for the leftmost octet in binaries is 10000000 (decimal equivalent is 128) and the maximum possible value for the leftmost octet is 10111111 (decimal equivalent is 191). Therefore for a "Class B" IP address, leftmost octet must have a value between 128-191 (128.X.X.X to 191.X.X.X).

Network 169.254.0.0 is known as APIPA (Automatic Private IP Addresses). APIPA range of IP addresses are used when a client is configured to automatically obtain an IP address from the DHCP server was unable to contact the DHCP server for dynamic IP address.

Networks starting from 172.16.0.0 to 172.31.0.0 are reserved for private use.

Class C- IP addresses

"Class C" IP addresses are commonly used for small to mid-size businesses. Three left most bits of the left most octet of a "Class C" network is reserved as "110". The first three octets of a "Class C" IP address is used to identify the Network and the remaining one octet is used to identify the host in that particular network (Network.Network.Networkt.Host).

The 32 bits of a "Class C" IP address can be represented as 110xxxxx.xxxxxxxx.xxxxxxxx.xxxxxxxx.
The minimum possible value for the leftmost octet in binaries is 11000000 (decimal equivalent is 192) and the maximum possible value for the leftmost octet is 11011111 (decimal equivalent is 223). Therefore for a "Class C" IP address, leftmost octet must have a value between 192-223 (192.X.X.X to 223.X.X.X). 

Networks starting from 192.168.0.0 to 192.168.255.0 are reserved for private use.

Class D- IP addresses

Class D IP addresses are known as multicast IP addresses. Multicasting is a technique developed to send packets from one device to many other devices, without any unnecessary packet duplication. In multicasting, one packet is sent from a source and is replicated as needed in the network to reach as many end-users as necessary. You cannot assign these IP addresses to your devices.

Four left most bits of the left most octet of a "Class D" network is reserved as "1110". The other 28 bits are used to identify the group of computers the multicast message is intended for.

The minimum possible value for the left most octet in binaries is 11100000 (decimal equivalent is 224) and the maximum possible value for the leftmost octet is 11101111 (decimal equivalent is 239). Therefore for a "Class D" IP address, leftmost octet must have a value between 223-239 (223.X.X.X to 239.X.X.X).

Class E -IP addresses

Class E is used for experimental purposes only and you cannot assign these IP addresses to your devices.

Four left most bits of the left most octet of a "Class E" network is reserved as "1111".

The minimum possible value for the left most octet in binaries is 11110000 (decimal equivalent is 240) and the maximum possible value for the leftmost octet is 11111111 (decimal equivalent is 255). Therefore for a "Class E" IP address, leftmost octet must have a value between 240-255 (240.X.X.X to 255.X.X.X).

Limited Broadcast

255.255.255.255 is used to send messages to all devices in the LAN and this IP addrress is known as limited broadcast IP address.
You have learned IP addresses, different classes of IP addresses, Class A IP address, Class B IP address, Class C IP address, Class D IP address, Class E IP Address, public IP addressprivate IP address, multicast IP address, Limited broadcast IP address and Automatic Private IP Addresses (APIPA).

Saturday, 15 February 2014

Create your own Virus using V-Maker | virus making tools free download


Every one wants to create a virus but virus creation is not a child's play. It needs a good skill in programming and knowledge about system resources. Today i am going to post about a virus creating tool. This tool is Virus Matic 2010 or in short V-Maker. You don't need to know any thing. Only select the option you want and it will create a virus for you.

Main Feature of V-Maker

You can create your own prank files/viruses with ease by V-Maker.
  1. Disable Mouse and Keyboard
  2. Disable Regedit
  3. Delete System32
  4. Block Site
  5. Disable Task Manager
  6. Take Screen Shot Of Victim  PC
  7. Message Box (When User Click on Virus)
  8. Automatically Download Start (When User click on virus download start automatic)
  9. USB Spread
Download Here:

Saturday, 8 February 2014

Turn Your Webcam into a Spy Cam for Free


You can now easily monitor your room, office or workplace for activities going on during your absence without having to invest on expensive hidden cameras. If you’ve ever wondered to find a way to turn your PC webcam into a spy camera, here is a simple and effective solution. This can be really handy to monitor your children and pets in home or even catch a cheating spouse red handed! For this, all you need is a computer with an Internet connection and a webcam attached to it.

If your computer meets the above simple requirements, then you are all set to go. The site calledUGOlog.com provides a free solution to simply transform your webcam into a powerful spy camera in just a few steps. You can sign-up for a free account and start using the service immediately.
Since UGOlog service runs as a web application from within the browser, there is no need to install any additional software on your computer. That means, when your spouse or children look through the installed programs, they don’t find anything that arouses suspicion.
UGOlog-Recording
The following are some of the advantages of using UGOlog service over other software programs or a conventional spy camera:
  • Firstly, the service comes for free, so that you don’t need to buy anything to start with.
  • Unlike software programs such as “Webcam Monitor” which is complicated to configure and lacks stealth operation, UGOlog needs no installation and is simple to setup.
  • UGOlog comes with powerful features such as as motion detection, email alerts, and interval snapshots.
  • You have the option to view the camera remotely from anywhere just by logging into your UGOlog account.
UGOlog-Watch
Once you’ve created your account, you can take up a quick tour and browse through theconfiguration guide to begin using the service. The free version of UGOlog limits the service for only 1 webcam and 50 MB of storage space. If you wish to setup more than one camera and need additional space for recording more videos, you can easily switch for paid plans as per your convenience
.

HackPack - Collection of Hacking Scripts..for kali linux

This is a collection of scripts to add to kali linux. It will create a new menu named Hackpack in your applications menu. It should work on any flavor of Debian, Ubuntu etc. But is made mainly for Kali along with LazyKali. This script will also add launchers for various programs installed by lazykali.

First Install the Lazy Kali Script in Kali Linux Tutorial Given Below

Lazy Kali Script for Kali

After Installing the Lazy Kali Script You will get the screen as shown below, 


Press 6 to check available Extra Tools


Type 3 to install Hackpack. It will prompt you to install Hackpack. Type Y to install Hackpack


Now click on Applications tab on the top left corner of Kali Desktop and you will find Hackpack tab

How to Hack Remote PC Using Telnet

Telnet is a common way to remotely control Web servers.Telnet is a user command and an underlyingTCP/IP protocol for accessing remote computers. Through Telnet, an administrator or another user can access someone else's computer remotely. On the Web, HTTP


The Telnet program runs on your computer and connects your PC to a server on the network. You can then enter commands through the Telnet program and they will be executed as if you were entering them directly on the server console. This enables you to control the server and communicate with other servers on the network. To start a Telnet session, you must log in to a server by entering a valid username and password. 

Open control panel.
Then go into programs. Click on  ‘turn windows features on or off ‘ .


It will open a dialog box, just check the Telnet Client option and hit the OK button.


Now open run Dialog box type services.msc
Locate the “Telnet” service, right-click on it and select Properties


In the Startup Type drop down menu, select “Automatic” instead of “Disabled”.Click on Apply button.


Right-click on the “Telnet” service again, but this time select Start option on right-click context menu. Telnet Server service should be running after this.


Click ok

How to Connect Remote PC using Telnet

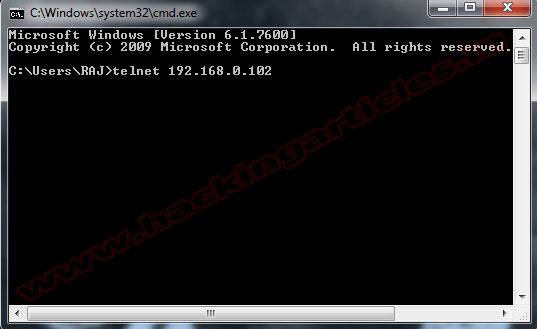
Open Command prompt and type telnet (Victim IP)


Type User name and Password of Victim PC


Now you can get access of remote pc